Sorry I dont understand when u say “sway bar place”
Sorry, I mean the place where you found the sway bar. The ones that do atvs etc.
Here is the link to Rath Store
This sway bar is not a a bolt on product yet. I’ll keep you all updated as progress go
Did you consider these? They appear to be a step in the right direction.
Replacement Offset Swaybar Arms
^^^ Thats a Great Idea. I was thinking that’s exactly what I need. I’ll see if they take the ones I have back in exchange.
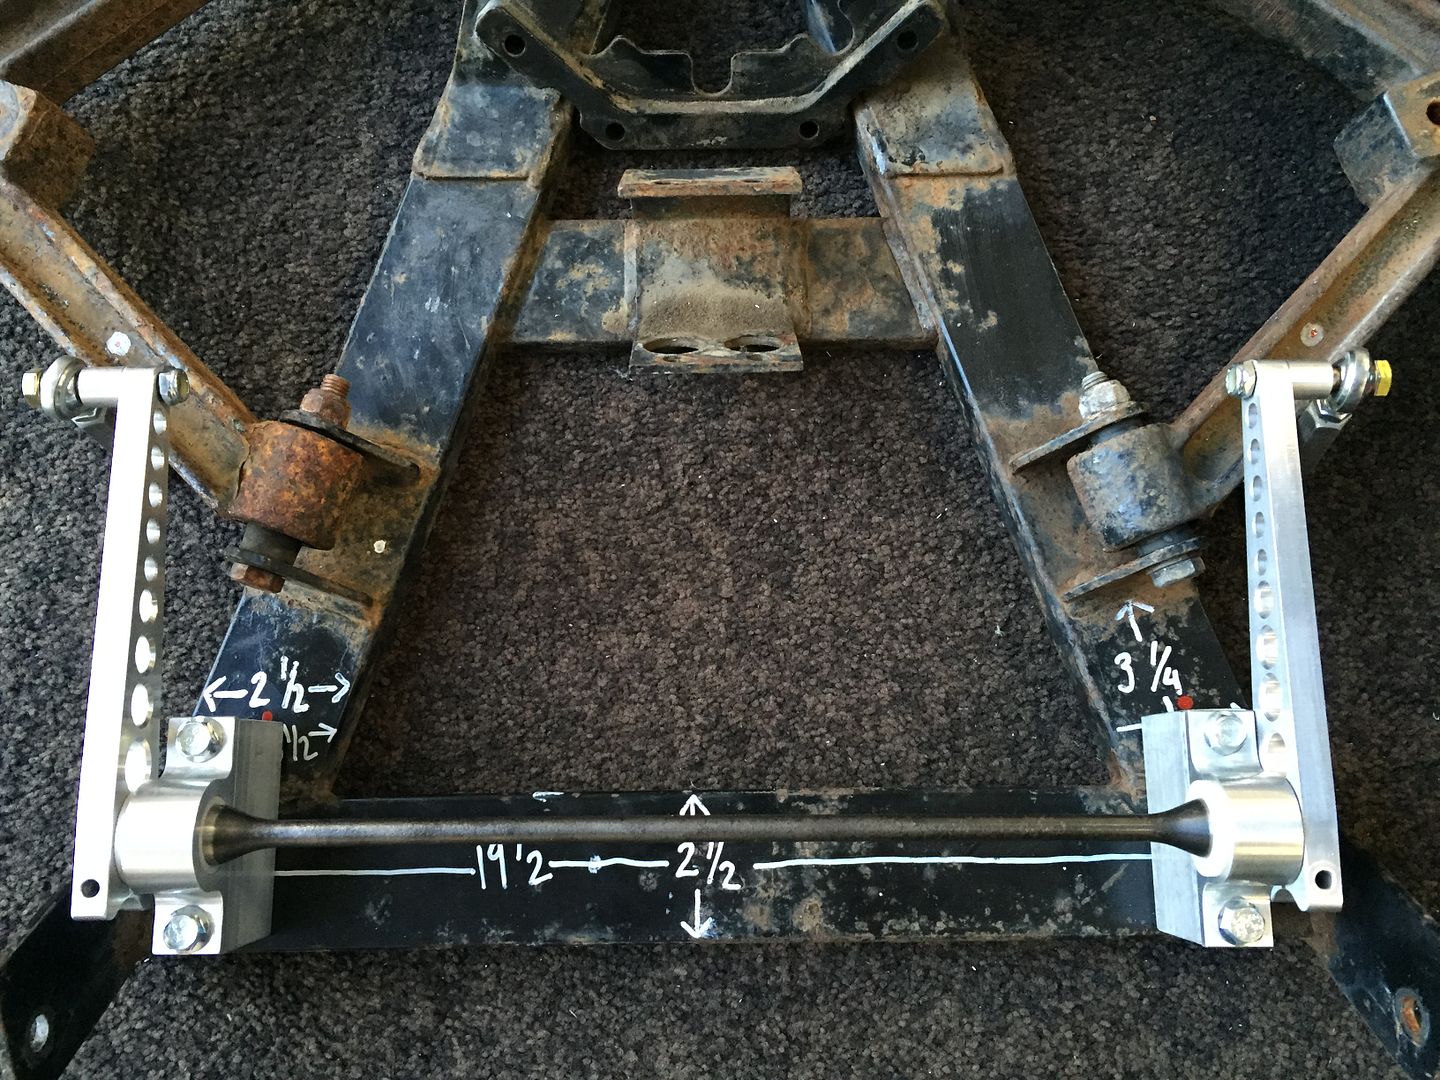
Looks I will just be able to bend, the arms I have. I called Rath and they said that’s all they do is Bend the straight arms that I currently have. What I’m going to do is get some Block aluminum and raise the sway bar up off the sub frame by a few inches I will drill and tap it and bolt it on to my sub frame. these blocks will become the mount points where the sway bar mounts. I’m gonna push the sway bar as far forward as I can. (Real close to the A-Arm pivot point) then once I know where the sway bar is gonna mount, that’s when I will put the aluminum sway bar arms in a vice and give them a little bend so the drop links attach as far out on the a-arms as they will go.
If you look at my picture above you will see a white dot on each a-arm. This is where I was thinking about mounting the drop links. Because this looks like the only location that is the only location free of the Tie rods and the motor.
(please note that in all cases where I use the term “shock” or “shock absorber,” I am referring to the aftermarket Progressive brand coilover replacement unit that incorporates an air spring and a damper. It is more than a shock.)
your problem is roll resistance, right?
On the GEM, this is usually effected by putting spring rates in that are comparable to a solid bar of steel. Literally there is no shock compliance or stroke on a lightly loaded stock GEM with its lead acid battery pack removed. Trust me I know. Try running a GEM with a 50aH 72v lithium pack in the front that weighs less than 60lbs. Ouch.
Couple of things I can add.
-
The Progressive shocks you are using were originally specced for the rear of a large heavy motorcycle. The expected load for a twinned set is a bit lighter than the front of a GEM, so the shock spring rates at max pressure may be a bit lower than you’d like. From reading a number of Goldwing forums, and looking at folks who heavily load their bikes (“generously proportioned” riders 2 up with trailers), the Progressive shock can take a liberal amount of overpressure. The seal is robust and typically lasts 15-20 years in service. Try a 20 or 30% overcharge on the pressure. And yes, of course, remove the ability for the shock to flow air into the opposite shock on compression. On the motorcycle application, the swingarm is connected to both shocks on either side so both shocks always share the load and cannot be differentially loaded. Hence a joint coupling makes sense because the air pressure will always be the same in both shocks. Not so on an independent suspension setup where you must isolate the air flows.
-
It’s not only the air pressure that’s important on an air shock. There’s something called progressivity as well (probably why the shock is named thusly). On a coil spring, the spring rates are linear for the majority of travel. so, on a shock that has a 300#/inch rating, putting 300lbs on it compresses it 1 inch, 600lbs compresses it 2 inches, and so forth. Of course, once the coil spring completely compresses and the coils bind, it essentially becomes a solid bar and the spring rate goes to infinity; that’s where bump stops and rubber compliance grommets come into play. Hopefully it doesn’t get to that point.
The air suspension is progressive. since you’re using the air as a spring medium, the absolute spring rate is dependent on the compression that has taken place before. A nominal 300#/inch air spring, after the initial inch of compression, may ramp up to double that for the next inch of travel, and increase further. it’s all dependent on the size of the air chamber in proportion to the amount of air displaced per linear distance traveled.
On mountain bike suspensions, we can tailor the progressivity of the air spring by adding or subtracting inert spacers that are incompressible and either shrink or expand the nominal air chamber. That effectively increases (by adding) or decreases (by subtracting) these spacers.
All that being said, my main point is that you MAY get all the effect you desire by increasing air pressure beyond mfg max specs (at your risk, naturally) and/or adding a non-compressible medium to the air shock’s air chamber to increase the progressivity.
Your plan of removing the air lines and screwing the air valve directly into the shock body will effectively increase the progressivity of the shock by removing the air space of the lines and plenum (however small an effect that may be). I could suggest by adding a small amount of ATF (the fluid Progressive recommends) to the air chamber you will increase the progressivity and may get a satisfactorily operating shock.
I would suggest removing the shock, depressurizing it, and filling the extended shock’s air chamber with ATF to see what the shock volume is.
Knowing that, drain the ATF fluid, replace the shock in service, fill air pressure to desired pressure that gives you a 40% sag rate. That’s the mfg recommended static sag. I would then start decreasing the shock’s air chamber volume by 10% intervals with ATF and see how you like the results.
Yes, time consuming. But, you may find that a very progressive shock increases roll resistance enough to obviate need for the anti-roll bars.
Another suggestion, since you seem to be handy with tools, is to move the rear shock mounting location outboard. There is a roughly 2:1 leverage ratio on the rear shock for a unilateral loading force. For a force that affects both wheels equally, the force is 1:1 but a rolling force causes the shock to compress at a 2:1 leverage disadvantage. By moving the lower shock mount laterally, you would decrease leverage and increase roll resistance significantly without affecting general compliance much.
Lastly, and for this I have to add the caveat that this is at your own risk.
There simply is no reason that I can see to run the air pressures of the tires at 30+ PSI. We are so conditioned to do so that at first, when my tires/rims were delivered, I thought nothing of it and put them on. Once the lead came out, the ride was so bad, I dropped tire pressure since the tire is a significant part of the small bump compliance and comfort of a suspension. I dropped pressure in 5# increments down to 20 pounds and found the ride was waaaay better. Air pressure in a tire is one of the main determinants of how much bending the carcass does during rotation so is probably the main parameter of how fast a tire heats up. that’s why a leaking tire blows out; with enough flex the rubber heats up, liquifies or burns, and fails sometimes catastrophically.
On my Honda 1000rr motorcycle, for instance, mfg recommendation was tire pressures in the 36psi range. For track use, we’d drop pressures to 16 PSI for much better compliance and traction. We’d go 170MPH for short bursts and never had a problem with heat.
So, I’m confident the GEM at 20 psi and 25MPH is safe at 20 PSI. the tire never showed any signs of heating and sidewalls remained room temp. I will try lower pressures; the limiting factor will be keeping the tire on the rim during max cornering loads. But 20 PSI is comfortable and safe. I’m sure rolling resistance increases (I know turning the steering while stopped on my 195/60/14 tires is harder), so hyper milers may not be pleased but folks replacing lead acid with Lithium usually have a range advantage…
I am following your progress with great interest; I’m likely to put the Progressive shocks on my cart (4 seater 2002 GEM) if you get them working well.
Outstanding post, Thank you
Hey thank you for your detailed post. Correcting the Air Line issue did help quite a bit
(Thank you Rodney) I like your Idea of adding or decreasing the internal air amount with the ATF. I will try your tips after I’m doe with the front sway bar. I have a good feeling about the addition of a sway bar. Fingers crossed. I just hope that after I get done with the front bar that I want to add a bar to the rear.  but adding a bar to the rear look much more straight forward.
How far along?
Woke up with a thought.
It should be possible to add dual acting cylinders to the same mounts as your air shocks.
Then you could cross connect with proper plumbing to adjust sway rate.
Might take some experimenting with flow control, mixing, and air pressure.
Anyone heard of doing this?
It’s just a pneumatic version of cross connected torsion bar.
David
Go back to bed:D
Bought a few donor Progressive shocks off evilbay. Couldn’t resist at $15 shipped. The seal is around $35. So I may be lucky and get one that holds air. Almost certainly not, otherwise it wouldn’t be $15 so factoring in a new seal 50 bucks each corner isn’t bad.
I had my motorcycle buddies school me on which ones to get- most important is to make sure the shaft isn’t scored; damaged boots (which almost all have by this time- they’re 30 years old) make scoring likely. Had the sellers take closeup of shaft. IF they couldn’t be bothered, didn’t buy. If the shaft looked OK, I grabbed it (sounds somewhat weird to write that ).
20 pounds in tires is great BTW. I just know I’ll be looking at electric power steering sometime soon though…
2 inch spacers raise the sway bar.
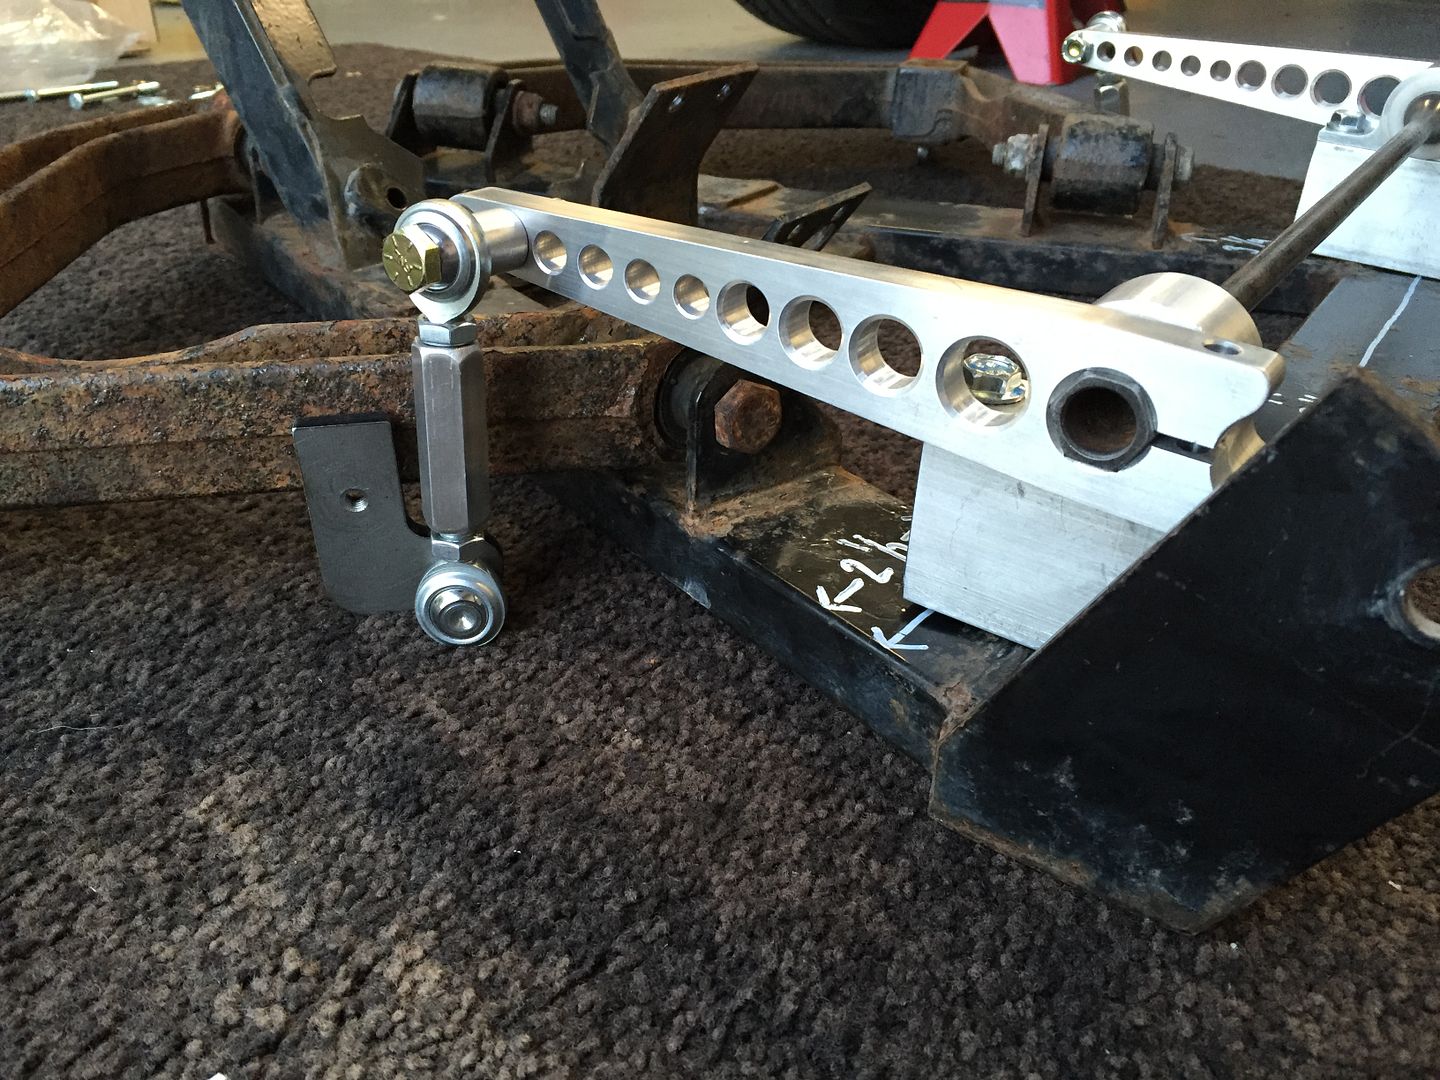
I would weld on or bolt on a lower tab that the link would bolt up to
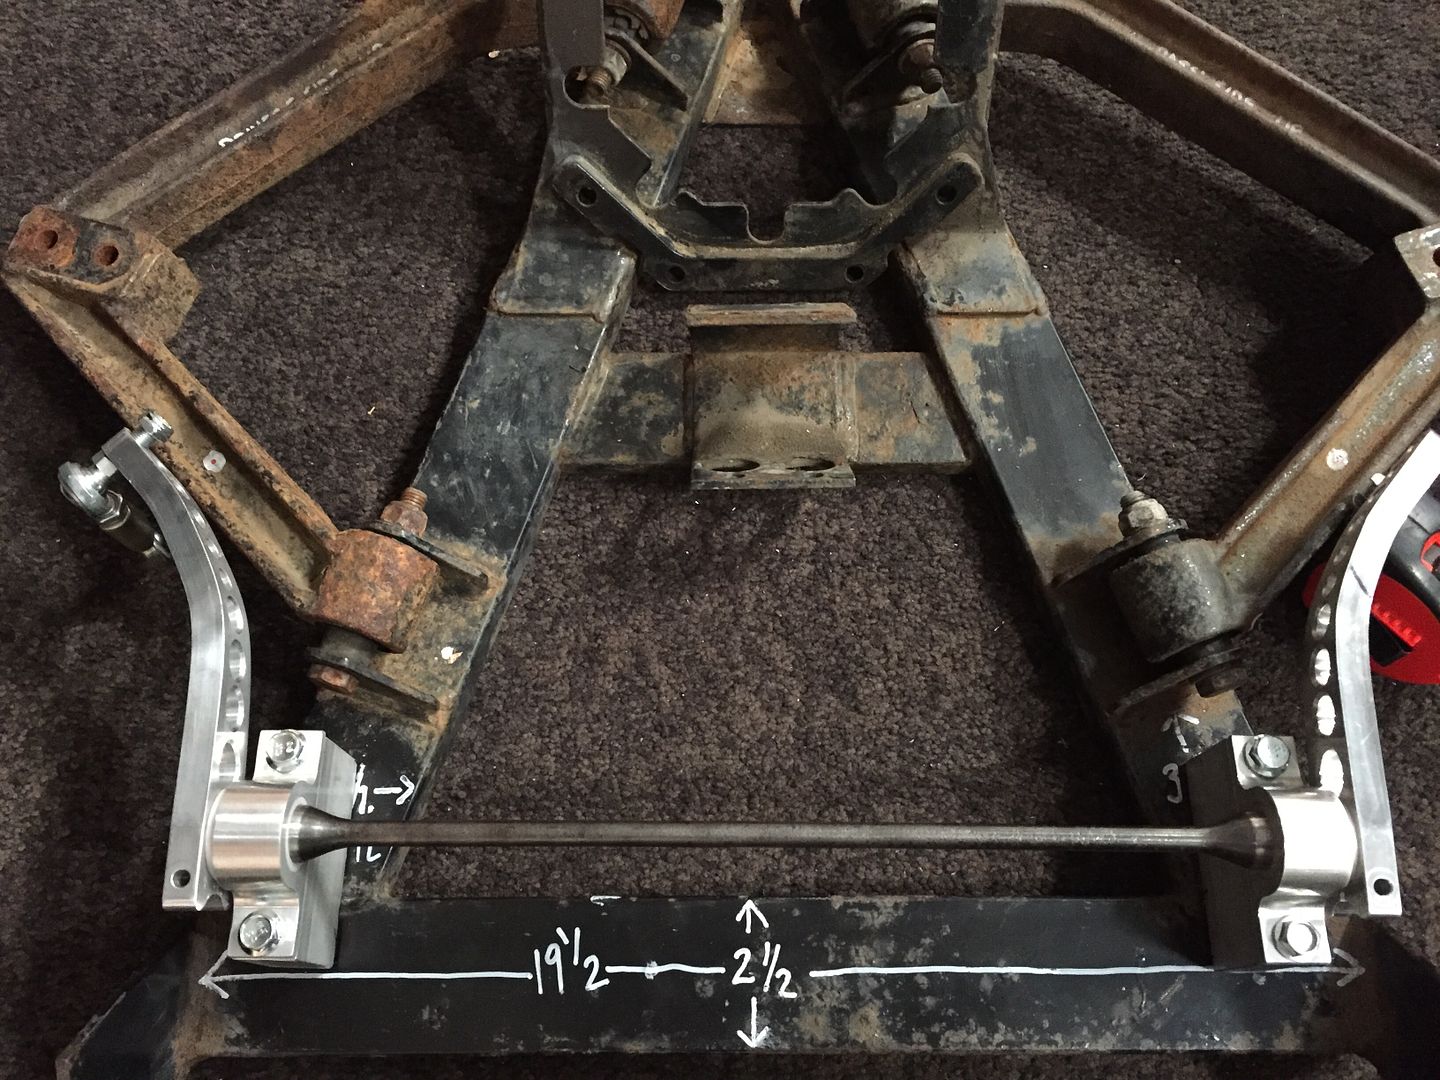
Getting closer [IMG]
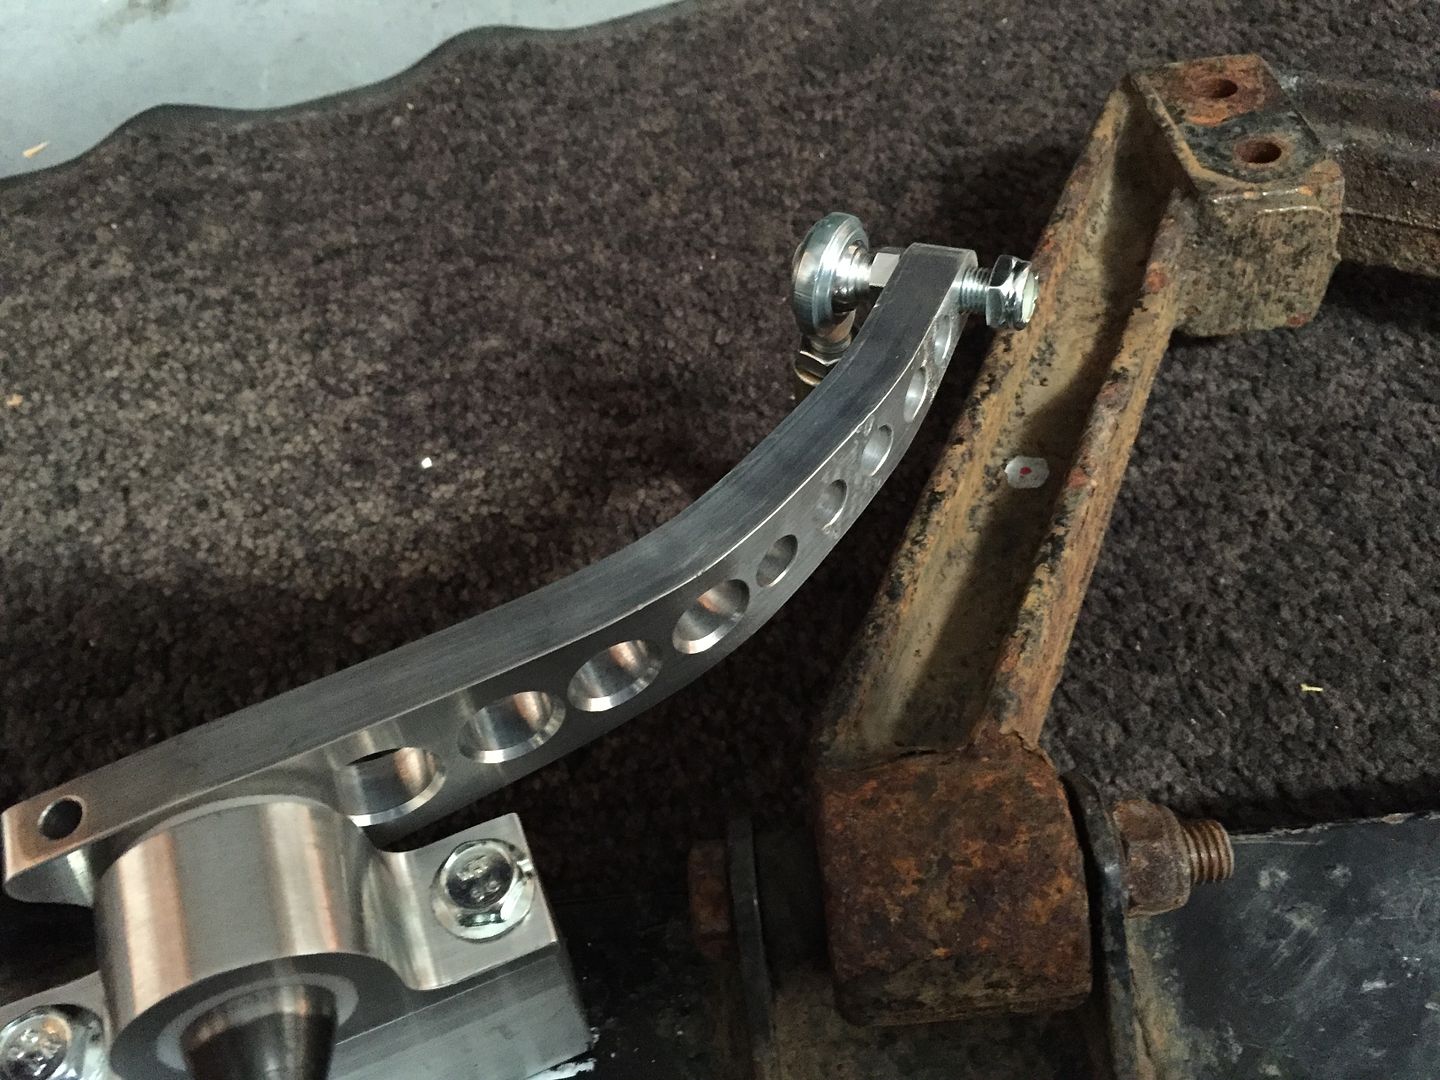
Looks good. That should work. You’ll be autocrossing in no time.
Before welding will you be making a dummy bracket? Move suspension thru full range.
I have to admit it’s hard for me to visualize the geometry.
Looks like the links should give you enough lateral movement.:clap2:
David: no welding is required. It’s a 100% bolt up kit