Yes. I prefer to keep the 120v but get the battery upgrade. I’m in no rush and it always feel better to tackle and objective the long and hard way  I love to figure things out. But of course when the help is there I always appreciate it. I will keep everyone posted once I get my converter and attempt to change the ball joints. There was practically no rubber at all and to top it off had to go buy the tool to take off the rims
  Well thats going to be a weekend project since I’ve been busy with work and honey do’s. But hey with all the stress will come great success
The chain drive is to loud for pleasant driving. Once I figure out the proper gear ratio for regular driving on our roads with MPH and torque, etc. I will be looking to swap to a belt drive.
Alternatively considered getting a different ratio made for the diff and go back to direct drive if the belt drivw is a hassle.
I purchased a complete battery pack from a Nissan Leaf. Came with 48 modules. Cost was $3,800 shipped. Call around for junkyards and ask for a Leaf battery pack. Many of these junkyards don’t know how popular the lithium battery swaps are so they aren’t charging a ton for packs. One local place told me they hate when they get a Leaf. They sold the last battery pack for $1,200. So you could get lucky and find a very affordable option.
Not to brag but I changed my ball joints at home with a big bench vice and lots of leverage. So its not really that bad of a job.
Thanks. It’s good to have a ballpark range. Especially knowing that batteries will eventually have to be swapped out in the future.
As for the ball joints I did go to my local autoparts store and used their loaner ball joint tool.
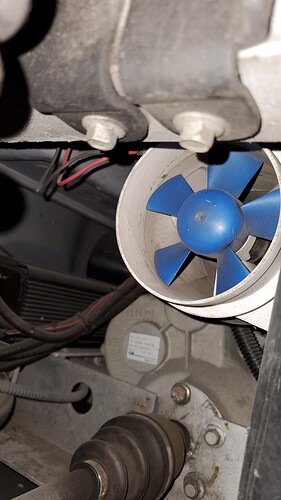
Here’s a picture of the motor under the car. Could anyone tell if it’s different that the stock motor? As you can see the PVC pipe coming out of the motor connects to a fan which is supposed to keep it cool. Also the regulator or whatever it is on the end of the motor isn’t connected to anything. Also you can see the controller. The stock controller is still under the floor board but I don’t think its being used. I mean you can have two controllers right? I know it’s dirty and I really want to clean this out but in the safest way. I just don’t want to remove the batteries because I’m worries about getting shocked 
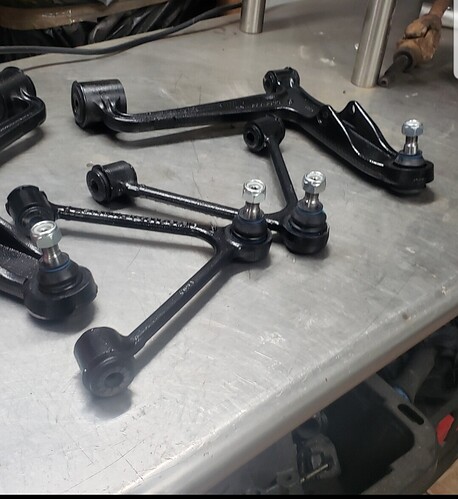
Here are my ball joints that need replacement. Glad I started digging through this cart before assuming everything was alright.
Ball joints are pretty easy in these if you know what you’re doing. I did mine without removing the control arms.
The sensor on the back of the motor is the speed sensor.
It still might use the old controller for everything except for actually sending the voltage to the motor. It looks like the 24 pin connecter is hooked up.
Just disconnect the negative terminals at the batteries and you won’t have to worry about being shocked anymore.
I could be wrong but that motor looks a lot like the stock 6 hp motor that has been painted gray. They may have taken it apart and took some windings out.
I’m curious about the air ducting. When you get a better view, snap a few more pics. I cant tell from the pic. Does the air enter at the brushes and come out the other end of the motor? Or just move across the brushes and out the other side of the same end?
Just running a pipe to the motor with a fan on it doesn’t do much if you don’t have a place for the air to exit.
Here’s a picture of the exhaust part of the fan. I will try and get better pictures once I start disassembling the cart.
Interesting! Thanks D!
It looks like a bilge blower from a boat. Those can be pretty loud.
I’m guessing the other end of this is that glued up bit on the band clamp?
Are there some holes on the other side of the band clamp ?
Yes I’m sure it’s glued and there’s a hole somewhere. But you’ve identified my comment regarding the builders mentioning “boat”. I guess that is what he said. It is loud but I turn it off when I’m parked of course. I drive a 4 door Jeep Wrangle JK and the sound his blower puts out is nothing in comparison especially when I remove the roof panels.
FYI I just received my new sevcon dc converter and all the 12 volt accessories are working perfectly. I had to take a little break from work to install it  . Only took 10 seconds so no harm done.
Newbie question for the lithium batteries. So in order for me to obtain the 120 volts I would need to determine the voltage of each cell in a module right? So if a cell was rated at a nominal voltage of 2 then I would need a total of 60 cells?
I just added some lights since getting the new dc converter. Much brighter than stock. Got them from amazon. Was inspired by the Ford Think Parts post. Thought about getting the halo with the drl but didn’t want to give up unnecessary battery juice.
4" Round Fog Lights Compatible… https://www.amazon.com/dp/B01MXVU2CP?ref=ppx_pop_mob_ap_share
Nice find on the lights. I was trolling for options and don’t think I saw those. What does the pattern look like when you pull up to a wall or garage door? Is there an obvious cutoff so it isn’t blinding oncoming traffic?
It looks like it is more of a high beam light.
As far as upgrading to lithium and how many cells it depends on what type you are thinking about. I’m not the expert here so others can feel free to correct me.
I think in order to run 120v you will be staying away from LiFepo4 as their physical size will make it abut the same package as what you have. Their voltage is around 3.2 per cell so you will need to find room for 37/38 of them.
Lithium is a different story. Their cells are more in the 4v range so you will be looking at 30 cells. They are also smaller given the same Ah for comparison. There are quite a few guys here salvaging these cells from cars but the designs of these salvaged packs may not support(or make it very difficult) to divide/reconfigure the cells into a set of 30. Some are configured in such a way that breaking a pack at the 30 will not work at all.
Luckily, it sounds like your set may be working good enough for now and you have time to do some research while running what you have.
Switching to lithium may also need a charger upgrade. I’m not sure the one you have will be the best.
Leave that DC/DC feeding off the original 72v for now. I’d still like to know what the old battery set drop vs the new battery set is. Keep an eye on that if you can. That will give you an idea how quick you will be switching them out.
You need to check out why all that other stuff is still in there (the old motor controller?). If it is not needed- pull it out. Maybe clean up the stray wiring too?
Thanks. I haven’t tested the light at night yet but will tonight. I have to bend the braket I am working hime projects so I haven’t put much time as I should to get an understanding of the Think. I still have to get the meters for the batteries though. But since I haven’t been driving it, it slipped my mind.
Here is a picture of the light pattern.
Excuse the mess in the garage. I have a stone veneer project I’m working on and fatigue has forced me to the throw things out of place lol.A fully charged deep cycle battery is around 12.7 volts so you are really running around 127 volts fully charged. So if you want to run the same in lithium you would need a 32s pack that has a fully charged voltage of just over 4 volts per cell. You charge to 4 volts so you never fully charge the cells which will increase the life span. Four chevy volt or chevy spark 16s packs modified to 8s packs would get you to exactly where you need to be. Finding a place for the forth pack would be your only problem to solve as three fit almost perfectly where the four center batteries go under the seat.
The headlights look like a great option. The beam looks exactly what you want. Did the bolt right on or did you have to make some mods?
I agree w/ David ^^^. I like the pattern of the lights. When you get the cart back out on the road you might post details of your mod on a headlight thread to make it easier for others to find. Either tack it on to an existing one or make a new one.
Thanks David for jumping in and finishing out my math on the 30~32s pack. I meant to come back to that but went off and did a squirrel. I like your (previous) thoughts on stopping at a 24s(96v) pack and getting the trunk back, saving some weight, and making things a bit more simpler.
Great. I can just put them in the back where the others currently are. Since they are smaller I should be able to adjust the back end to its normal position.
I removed the baffle from the lights then drilled holes on both sides of the housing of the lights where the baffle normally would connect to. This part of housing protrudes out so drilling into them carefully did not expose the components of the light itself. Then I just pulled the brackets outwards until it lined up enough over the holes I created and used screws I had for a projector mount kit. Since it’s an aluminum housing it was easy to thread the screws on. It was a tight fit but fit just right. If I take it off to do more work I will post pictures. I could have created a new braket but wanted to see if I could just use the original parts instead.
Ok. I got the fuse for the relay but the lights don’t come on. The horn and hazards work but no go on the lights or blinkers. When I bypass the relay everything works fine. What would cause the 12volt relay not to function properly?


