I have an older GEM with the original charger missing, and I accidentally sparked the wrong wire while trying to sort out the charging harness. I’ve since replaced the charger with a lithium-compatible charger, but now I’m getting Error Code 64 a low-voltage warning.
What’s confusing is that all my 12V accessories seem fine—headlights, horn, and turn signals all work—and I’ve already checked the fuses with no blown ones found. Under the hood is a complete rat’s nest of wiring, and I’m not sure where to start troubleshooting.
Has anyone dealt with Error 64 low-voltage indicator after a charger swap, and what should I check first?
-64 is a traction code. The coil isnt getting sufficient voltage to close or at least thats what the controller thinks.
Cant say that I’ve ever seen that one. Had to look it up.
For the op, it’s not the wiring being tangled, it’s all the extra wires and the crimps. That spark could have been anything. By anything, the DQ and the coil can be pretty tough, or even unrelated, but he controller, certain circuits/ functions don’t react well to shorts.
Yes, a bit of background is going to be needed here.
What we know-
2013 e2
Original charger missing (along with the DC Converter)
→ If accessories are working- then there is some other source of DC power.
NEW Lithium charger is installed?
→ so this means some sort of lithium pack is installed? It is not always easy to get this right
=== Questions to you
Is this a new car to you?
Did you do the lithium install? (if no, can you give details on installer)
What lithium battery is this?
When was this car last working properly?
When you see the code 64, What are you looking at? (the dash display when you KeyON?)
Does this car charge OK (as near as you can tell?)
Do you remember what wires you sparked?
Personal
What is your background?
What is your skill set?
What is in your toolbox?
Observations:
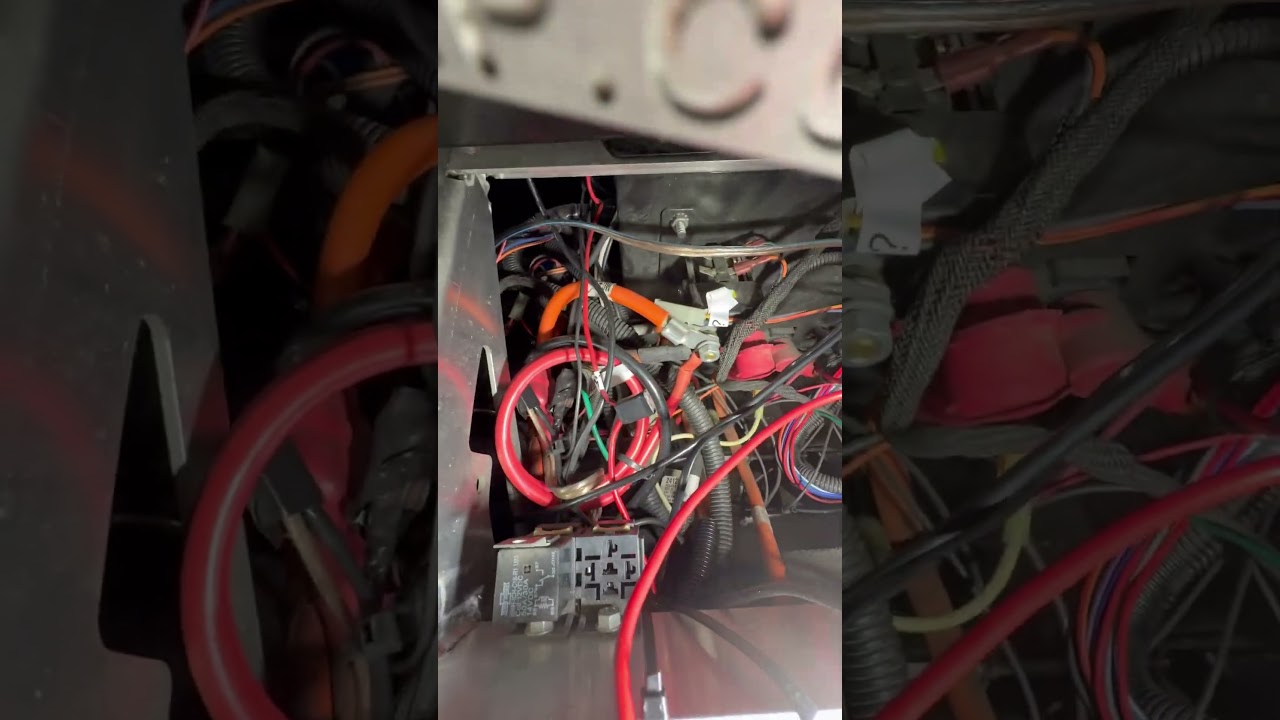
The rats nest of extra wires concerns me. This is not normal. Yes, there are a few, but what has this poor car been through? ← This car may need some extensive sorting out.
Original Factory wiring is usually all in harness sheathing. Anything tapped into another wire is going to be suspect. There may be a few wire taps from a dealer addition, but not too many.
These extra wires may not be the issue(we can come back to them). If car is not rolling/driving now then we need to look at the controller diagnostics.
Controller code
-64 The line driver input (P2-17) is less than 12% of battery volts.
This status code will be displayed when the control detects that the line driver input (P2-17) is less than 12% battery volts when the key switch is turned on.
I can see how you might think this was a low voltage/power warning, but it is not.
The controller is looking at some of the input wires and it does not like what it sees.
I agree with JarJar.
We need to do some voltage checks. Do you have access to a handheld digital meter?
This may also be just a loose pin on the 23p Controller plug. P17 to be exact (it comes from the MC).
I have had only one cup of coffee this morning. Need more…
So I changed it to lithium and the car worked perfectly just fine but I was like I’m gonna go ahead and takeoff the ride on charger so somebody doesn’t use the old charger and it might messed up the lithium because it’s not for lithium. As I was trying to get the charger out, it was a tight fit and the white wire that comes out of the charger. I didn’t know where it went, and I accidentally touched the fat green wire and another white wire (both sparked because at the time i did not know the black small cable was 72vB+ and then to bypass the charge and drive the 72 positive B positive connects to the little green on the main harness the little cable.
This is a good plan, but has a major flaw. The Yellow/Black DQ charger also contains the source for 12v power for the car. You will need to install another DC Converter to power the car. This DC Converter needs to have 2 outputs (1 switched, 1 constant) and the Input/outputs isolated. Difficult to find on Amazon, but not impossible.
To prevent the charger from being used to charge your new lithium pack, find the input cord and unplug it.
It is tough to follow your spark event description, but it most likely is not the cause of your -64. It IS possible that you damaged the charger tho. Any sparks involving the green wire can damage the interlock function.
It is also good practice to fully power down the car when playing with wiring. It keeps things from the sparking and damage to some expensive/difficult to find components.
Back to your -64 (which I see on your Dash Display.)
Power down the car
remove the 23 pin main harness connector from the top of the motor controller.
Inspect both the connector and the controller socket. Use a good light.
looking for contaminants/corrosion/anything unusual. Special attention to Pins 2 and 17
If someone is watching, grunt a couple times and give harness connector a sniff.
Reinstall 23p, giving it a little skritch/wiggle as you are pushing it on until it clicks.
If the black box amazon called a 72v battery has a bms that’s worth a shyt this isn’t an issue as long as the DQ profile is is set to charge above the final voltage allowed by the bms. Gem dq chargers come with multiple profiles installed. Its just an lfp4 battery bank.
Irony. I just looked at that very same pack in person a few hours ago. A friend bought a new no-name 72v import nev for his wife but the goons outfitting it put 60v nominal batteries in, so he switched it to that. It charges to 84v but i see your dillema now, its not known to me if, for that pack, the bms or the charger is where the max charge voltage cutoff is controlled as the charger is branded to cut off at 84v too
Lets start with what @AssyRequired suggested: the 23 pin connector is on top of the controller. That is the gray box by where i imagine that old charger was.
Ok, this is why a pic(or video is sometimes really helpful)
You are not working with a factory stock cart.
That black cube transformer thing is an aftermarket charger. It can go away.
If this charger still has wires connected to it, the interlock might still be going through it. Locate the little green wire. That wire goes around to the PSDM. It should go J1 plug/harness (about 9 o clock position). Remove that wire and the dash display will go into charge mode and show a little charge icon. This wire (make sure you have the correct one) needs B+ to release the interlock and for the car to go.
The yellow and black charger mounted under the shelf is the factory charger and it most likely has a dc converter built in. It is where your 12v is coming from that is needed to run the car subsystems. It needs to stay for now.
The 23p you need to find is on top of the motor controller. It is a grey box, most likely mounted on the shelf above the yellow/black factory charger. The controller will also have some big orange power cables going to it.
See if removing/resetting the 23p will clear that 64 error.
Return with your results and further instructions.
Whats odd is that the BMS is not even showing any drain. I seem to recall it was pretty sensitive on the one i was working with last weekend. It would show a slight negative for current iirc with just the dc-dc converters running in the cart i was working on.
Can you go to to “Page 2” on the BMS screen for the battery pack, take a picture and post it? There are on screen “switches” at the top of page 2 for the charge and discharge fets, both should be green, when we charged the battery overnight with the charger it came with, when we started on it the next day. It had actually turned its discharge fets off at some point. This is the DSC or DSG switch at the top. What i dont recall is what other settings or what elese may be on that screen.
The identical one i worked on last weekend, i don’t remember if it displayed “standby” on page 1. I do remember a cartoon like “talk bubble” with ZZZ (sleeping) to the upper right of the percentage circle when it sat fir a bit.
76ish volts is all the pack charges to, even with the factory charger. As i think page 3 then “next” showed it as a 23 cell pack. .
If your DeltaQ is cooked, there are plenty of other dedicated options out there to replace the dc-dc function.
Remembered that the BMS touch screen is in the photos on amazon. Nothing to set on page 2 except the toggles for the discharge and charge fets . Discharge is on the left “DSG” and Charge is on the right “CHG” -its mislabeled in this image. Both should be green / on.
With DSG turned on, you can check voltage at the battery out lugs, it should roughly match your BMS displayed voltage.
And based on the pictures, I’m incorrectly remembering “standby” on page 1 of the display. I do recall the ZZZ bubble and some less than 1 amp draws showing on the display of the one I was working on last weekend.though. First time I’ve seen / used one of these JBD BMSes though…
If B+ matches the BMS and the fets are on, I doubt it’s the Elefast battery or charger. Bad connector somewhere or hacked up wires in the GEM or a safety switch somewhere or like you said, maybe the dc-dc converter in the DQ could be toast, but I seem to recall they are pretty tough - aside from when one gets water inside it, it’s supposed to be sealed / at least splash resistant, or sending B+ back on the ground lead of the aux connector I think it is?
Despite being big and scary with some odd facial tattoos that I think may be done in BIC ballpoint pen blue or possibly either Crayola crayons or expired soy sauce @AssyRequired is pretty damn good at trouble shooting wiring over the internet if you stick with him.
Locate your Main Contactor. It has two big orange cables going to it, and two smaller 18ga wires that control it. One is probably Orange, the other is Black/pur (iirc).
Measure what is on the small Orange wire (ref B- on front of PSDM)
You should see PackV. → Verify (Y/N?)
If Y, then Measure what is on the small Bk/pur wire (ref B- on front of PSDM)
You should see PackV minus a couple volts. → Verify (Y/N?)
Return with your test results and further instructions.